


A harvest apron is the perfect addition to your gardening toolkit, providing a hands-free way to gather fresh produce like beans, peas, or apples. In this guide, we’ll walk you through step-by-step instructions on how to sew your own harvest apron, making it both functional and stylish. This project is beginner-friendly, so even if you’re new to sewing, you can easily follow along. Let’s dive into the details of creating this versatile gardening accessory.

Materials You’ll Need:
Before starting, gather the following materials:
- Cotton Fabric: Quilter’s cotton works best for its sturdiness.
- Thread: Use all-purpose thread that complements your fabric.
- Sewing Machine: A basic machine will work for this project.
- Cutting Mat, Rotary Cutter, or Fabric Scissors: For cutting your fabric precisely.
- EZ Point and Turner: A helpful tool to turn fabric pieces right-side out.
- Loop Turner: This inexpensive tool is perfect for creating loops and ties.
- Measuring Tape and Fabric Clips or Pins: For marking and holding fabric in place.
Fabric Cut List:
Here’s a breakdown of the fabric pieces you’ll need to cut:
- Small Loop: 2″ x 5″ (Cut 1)
- Thin Ties: 2″ x 28″ (Cut 2)
- Waistband: 7″ x 24″ (Cut 1)
- Waistband Ties: 6″ x 40″ (Cut 2)
- Outer Apron Pocket: 26″ x 40″ (Cut 1)
- Inside Apron Pocket: 26″ x 40″ (Cut 1)
Watch video tutorial
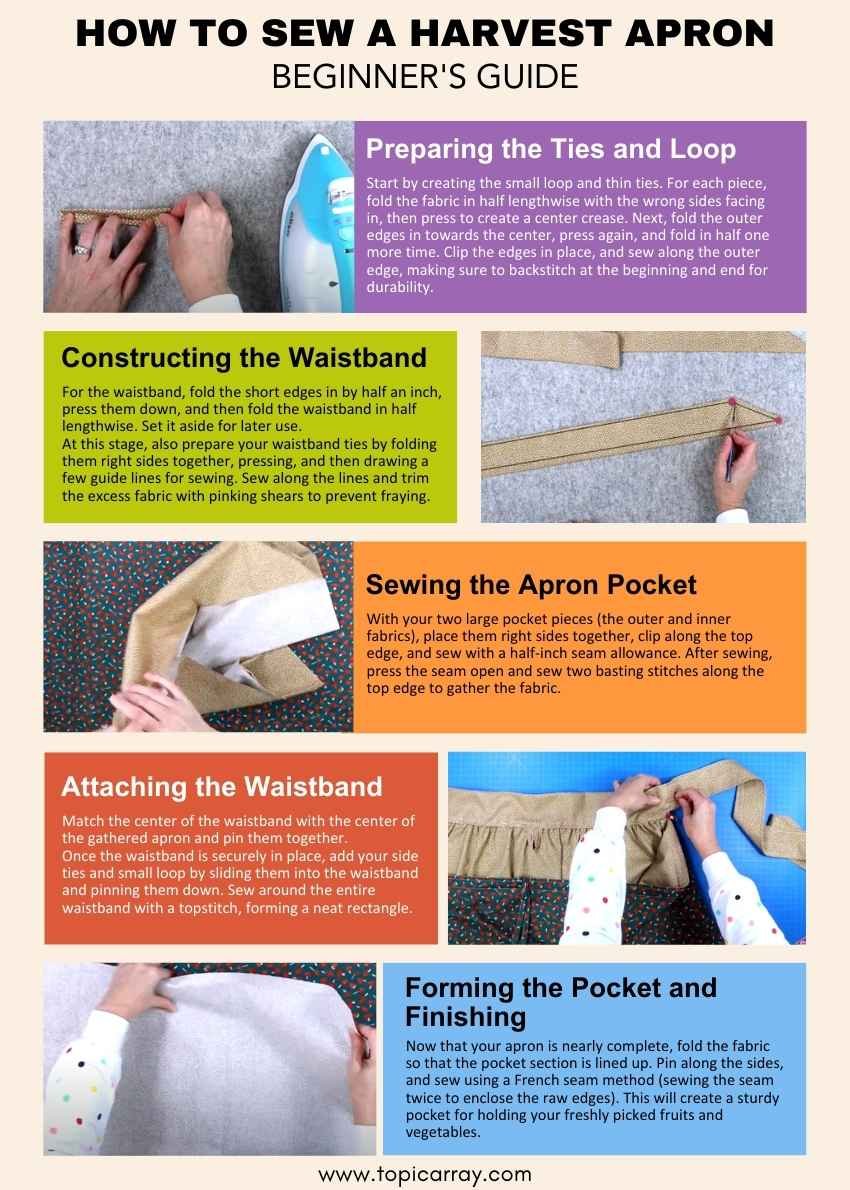
Step 1: Preparing the Ties and Loop

Start by creating the small loop and thin ties. For each piece, fold the fabric in half lengthwise with the wrong sides facing in, then press to create a center crease. Next, fold the outer edges in towards the center, press again, and fold in half one more time. Clip the edges in place, and sew along the outer edge, making sure to backstitch at the beginning and end for durability.
Tip: To make the ties more professional, press one end of each tie in by about half an inch before folding and sewing. This will give a finished edge.
Step 2: Constructing the Waistband

For the waistband, fold the short edges in by half an inch, press them down, and then fold the waistband in half lengthwise. Set it aside for later use.
At this stage, also prepare your waistband ties by folding them right sides together, pressing, and then drawing a few guide lines for sewing. Sew along the lines and trim the excess fabric with pinking shears to prevent fraying.
Pro Tip: Pinking shears make it easier to avoid frayed edges, but if you don’t have them, regular fabric scissors will work.
Step 3: Sewing the Apron Pocket

With your two large pocket pieces (the outer and inner fabrics), place them right sides together, clip along the top edge, and sew with a half-inch seam allowance. After sewing, press the seam open and sew two basting stitches along the top edge to gather the fabric.
How to Gather Fabric: To gather, gently pull on the top thread while pushing the fabric toward the center. Gather until the apron’s width matches the waistband’s width.
Step 4: Attaching the Waistband
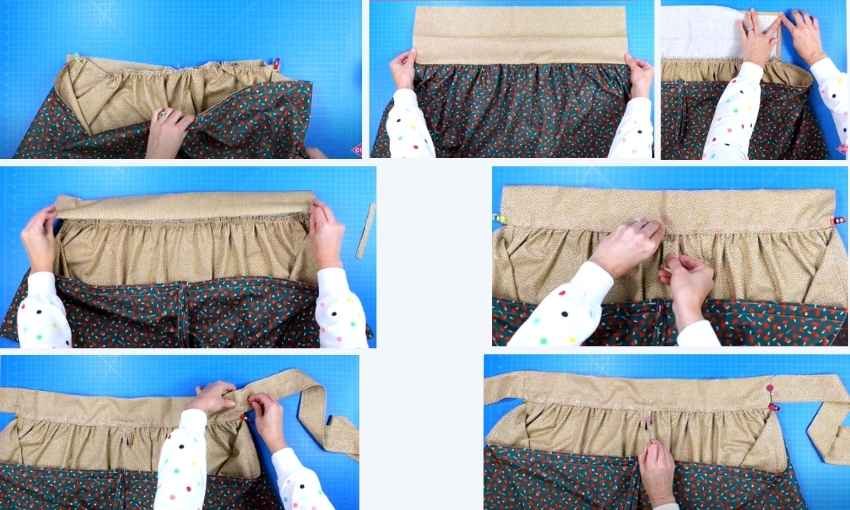
Match the center of the waistband with the center of the gathered apron and pin them together. Sew along the top edge, starting and stopping with a backstitch. Fold the waistband down by half an inch and press it, then fold it over the gathered fabric to create a clean, finished edge.
Once the waistband is securely in place, add your side ties and small loop by sliding them into the waistband and pinning them down. Sew around the entire waistband with a topstitch, forming a neat rectangle.
Step 5: Forming the Pocket and Finishing
Now that your apron is nearly complete, fold the fabric so that the pocket section is lined up. Pin along the sides, and sew using a French seam method (sewing the seam twice to enclose the raw edges). This will create a sturdy pocket for holding your freshly picked fruits and vegetables.
Finally, press the entire apron and topstitch along the sides to give it a polished look.
Final Touches
Your harvest apron is ready to use! The adjustable ties ensure that it fits comfortably, and the pocket is spacious enough to hold a variety of produce. Whether you’re gathering small beans or large apples, this apron will help make your gardening tasks easier.
Why Use a Harvest Apron?
Harvest aprons are incredibly practical, especially for gardeners who need an easy way to carry their harvest without damaging it. The large front pocket allows you to gather fruits, veggies, or even flowers, while keeping your hands free. Plus, it’s customizable! Choose fabric patterns that reflect your personality, whether you prefer bright florals or rustic tones.
By following this guide, you’ll have a durable, attractive harvest apron in no time, perfect for any garden enthusiast or DIY lover. Happy sewing!


